How It Works
The Upload Tool
The Upload Tool allows you to manage and publish your 360visit for others to see.
What you will need
- A 360° video
- One or more 360° photos
- Floor plans
- A thumbnail
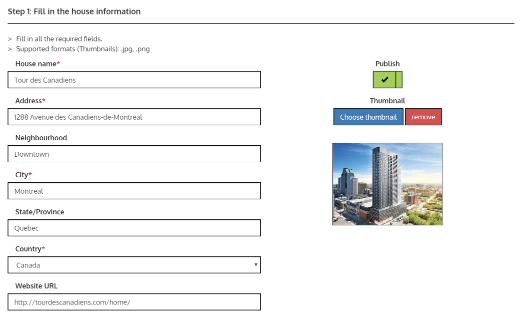
1. Fill out the visit information
Let your clients know what you are trying to showcase in your 360visit by sharing relevant information, including physical address, website and a thumbnail.
The house name, address, city and country are the only required fields.
Choose whether or not you want to publish your 360visit to the public for others to view. You can always switch back to private if you ever change your mind.
Upload a thumbnail that will help others know what they're about to visit. A default image will be used if none are uploaded.
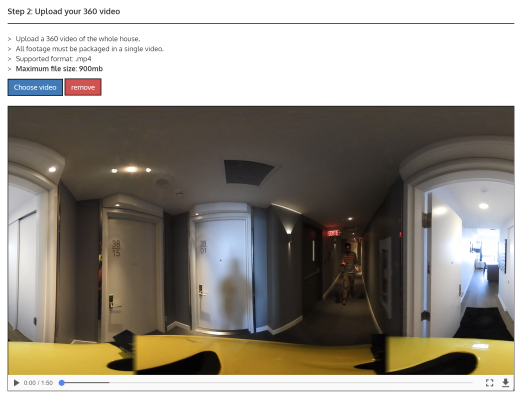
2. Upload your 360° video
Upload the 360 video that you wish to use for the 360visit.
All your clips must be merged in a single video and it should have an aspect ratio of 2:1 (e.g. 3840 x 1920).
For now, only .mp4 files under 900mb are supported.
The video player may vary across different browsers.
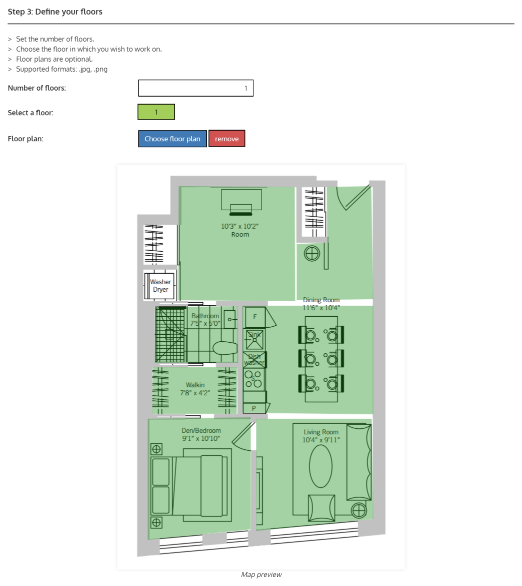
3. Define your floors
Tell us how many floors your visit contains.
Set the number of floors and upload a floor plan if you have one. A list of the areas (in the next step) will be automatically generated if you do not provide a picture.
Tip: A picture of around 600 x 850 pixels would be ideal.
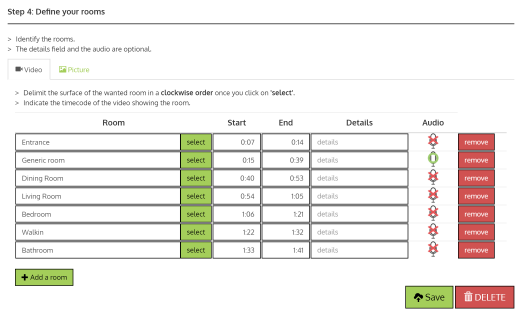
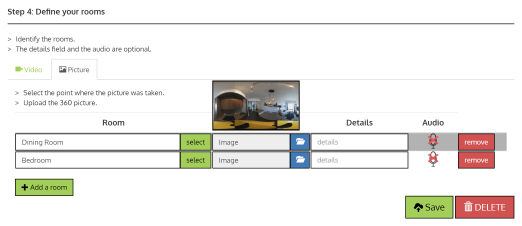
4. Define your rooms
For 360° videos
Click the [Add] button to add an area and fill in the information.
- Name: The name of the area.
- Select: Click to trace the area on the provided floor plan. If no floor plans were uploaded, this button is disabled.
- Start: The timestamp on your video when the area starts.
- End: The timestamp on your video when the area ends.
- Details (optional): A short description of the area. It has a character limit of 80.
- Audio (optional): Click to record a sound clip using your microphone. You will need to allow the application to access your recording device in order to use this feature.
- Remove: Remove an area.
For 360° photos
Click the [Add] button to add an area and fill in the information.
- Name: The name of the area.
- Select: Click to mark the area where the photo was taken on the provided floor plan. If no floor plans were uploaded, this button is disabled.
- 360 Image: Select a 360° image that represents the area.
- Details (optional): A short description of the area. It has a character limit of 80.
- Audio (optional): Click to record a sound clip using your microphone. You will need to allow the application to access your recording device in order to use this feature.
- Remove: Remove an area.
Save and Delete
Once you are satisfied with the changes, you can click the [Save] button to upload your 360visit.
If you are editing one of your previous 360visit, you have the option to [Delete] it.
Please note that after uploading a video, there will be a processing period where we will optimize your video to play better and faster accross different platforms. This may take a while depending on how busy the website is.
There are 3 icons that indicate the state of a 360visit. They appear at the top of the thumbnails when browsing.
- Private: The 360visit is set to private. Only you have access to it.
- Processing: The video is being processed.
- Warning: Something unexpected happened to the video processing. You may try to upload again.
Private
Processing
Warning
The Visit Viewer
The Visit Viewer is the application shows the 360visit.
How to Start
From your internet browser, head to Browse Houses and click on [Video] or [Photo] depending on what you want to view. If you are on an android device, this will redirect you to the 360visit Application.
Note: You will need a Gear VR with a supported device to view the 360visit in VR. Our application is not currently available from the Google Play Store.

The Web Player
Click and drag the viewer to look around.
Select an area on the floor plan to visit that room.
You can pause and mute the video using the buttons at the bottom left.
The arrows at the bottom right allow you to switch floors if there are more than one.
You can display this 360visit on your own sites. Select a size, then copy and paste the embed code to your website.

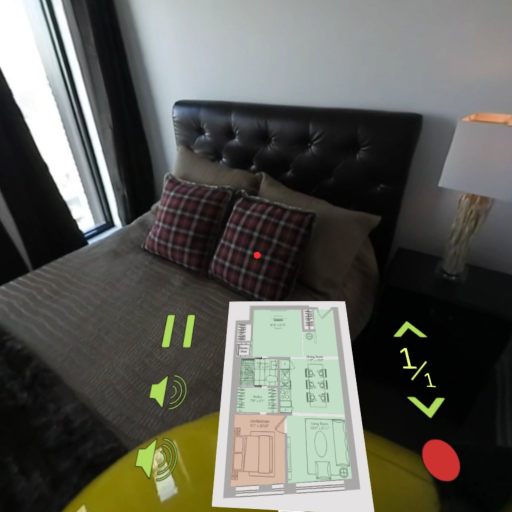
The VR Player
Put your headset on to view the 360visit.
Once the application loaded, you can tilt your head down to reveal the floor plan/list of areas and a few buttons (pause, mute, change floor).
To select something, hover over the area and click the select button on your headset (placed to the right on a Gear VR). Alternatively, you can hover over the area for a few seconds to select it.
The Live Visit Scheduler
The Live Visit Scheduler makes it possible to plan live visits with other people so you can discuss and experience a 360visit together.
Get Started
Head over to the Live Visit Scheduler to access your 360visit calendar. From there, you can view your past and upcoming 360visit meetings in detail, as well as schedule new ones.
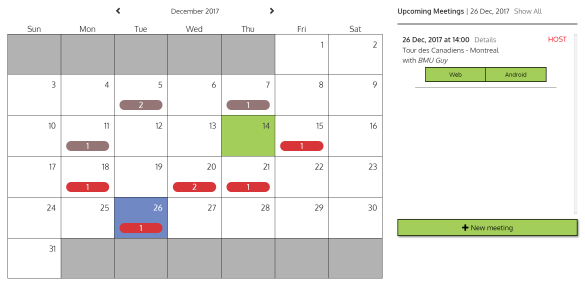
The Calendar
The calendar shows your meetings. The date highlighted in green is the current date. You can change month by clicking on the left and right arrows at the top. The number in the red capsules show the number of meetings there are on that specific day.
The right panel shows information about your meetings. By default, it will show all the upcoming meetings, but if you click on a date, which will be highlighted in blue, it will only display the meetings on that day.
To add a new meeting, click on the button [New Meeting].
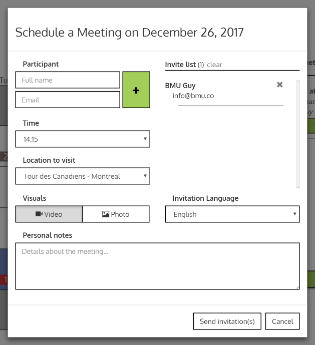
Schedule a New Meeting
When clicking on [New Meeting], a new window will appear for you to schedule a live 360visit. The date of the event will be the one you select (highlighted in blue). If none are selected, the date will be set to the current day.
There are a few fields to fill in before sending the invitations.
- Participant: The name and the email of a participant. Click the [+] button when you want to add them to the Invite list.
- Invite list: The invite list shows all the participants that are invited. You can remove a participant by clicking on the [x] button next to their name, or click the [clear] button to clear the whole list.
- Time: The time of the meeting.
- Location to visit: Your 360visit. For now, we only allow visits for locations you've created.
- Visuals: Choose to either show the video or the photo section of the 360visit.
- Invitation Language: The language of the email that will be sent to the participants.
- Personal Notes (optional): This is to help you remember certain details about the meeting (e.g. which room the participants want to visit). Only you can view these notes.
When you're ready, click on [Send invitation(s)] and an email will be sent to you and the participants. Note that some email clients will receive the mail in the spam folder. It may be possible that the email doesn't get sent at all for now. If that occurs, you can send them the direct link (see Meeting Details).
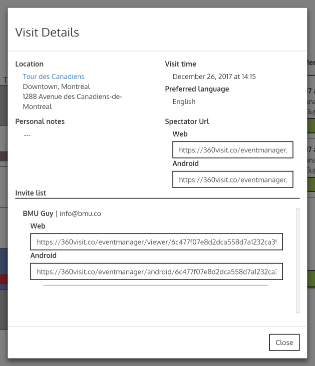
Meeting Details
Click on the [Details] button next to an upcoming meeting to view information about that meeting.
Here are the provided details.
- Location: The 360visit location. You can click on the 360visit to preview it.
- Visit time: The date and time of the visit.
- Preferred language: The preferred language of the participants.
- Personal notes: Your notes about the meeting.
- Spectator Url: The link for spectators to view the visit. You can copy and paste the link to those who wish to spectate the visit with you. Send them the web link if they're viewing on web, and Android if they're viewing on Android.
- Invite list: The list of participants. You can copy and paste them the Web or Android link if they didn't receive an email from the initial invitation.
Communication
Communicate with the other participants directly from our application. Note that participants cannot communicate between the web and the Android application for now (i.e. Someone on Android won't be able to read a message that was sent from the web).
On the Web
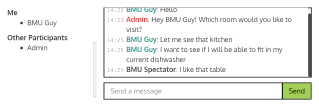
On the web, you can communicate with other people by typing in the chat box, located at the bottom of the Visit Viewer.
The different colors in the chat represent different roles.
- Red: The organizer of the visit
- Green: The invited participants
- Black: The spectators
Spectators can click on a participant under the [Other Participants] list to view the perspective of that particular person.
On Android
You can use voice communication when using the Android 360visit application. It is recommended to use earphones when communicating so that audio feedback does not occur.